Jekyll은 github에서 제공하는 static website generator입니다. Github repository에 jekyll blog를 위한 code를 push하면, github가 static website를 만들어줍니다. 이 때에, github에서 제공하는 dependency는 한정되어 있습니다. 바꿔말하면, 여기서 제공하지 않는 dependency는 사용할 수 없다는 뜻입니다.
이전 편에서는 제가 원하는 요구사항에 맞춰서 blog theme을 만드는 과정을 보여드렸습니다. Basically Basic theme에서, Aiden 님의 블로그의 category와 tag를 사용해서 post를 구분하는 개념을 사용하여, jekyll-paginate-v2 plugin을 적용해서 blog를 제작하는데 성공하였습니다.
하지만, 해당 결과물을 blog 생성을 위한 github repository에 push 했을 때 jekyll blog가 제대로 작동하지 않았습니다.
Contents
The Problem
결론부터 말하자면, jekyll-paginate-v2 plugin은 실제 github에서 생성되는 static website에서는 동작하지 않습니다. github에서 제공하는 dependency에 포함되어 있지 않기 때문입니다.
그러면 방법이 없을까요? 방법은 있습니다!
Solution
_site Folder
This is where the generated site will be placed (by default) once Jekyll is done transforming it. It’s probably a good idea to add this to your .gitignore file.(description of _site folder)
_site folder는 Jekyll로 build 된 파일들이 저장되어있는 곳입니다. jekyll serve 명령어로 local에서 볼 수 있는 블로그 화면은 _site folder에 있는 파일들을 보는 것이죠. 여기서 해결책이 생깁니다.
- Local에서는 jekyll-paginate-v2가 제대로 동작되어서 _site folder의 결과물이 생성되었다.
- Github에서는 jekyll-paginate-v2가 무시되어서 블로그가 build 되었다.
예 맞습니다. Github에서 build하게 하지말고, local에서 생성된 _site folder를 바로 repository에 올리면 됩니다.
Solutions for Using Jekyll-Paginate-V2
위의 방법을 사용하기 위해서는 2개의 repository가 필요합니다.
- 기존의, .md 파일로 작성한 blog post를 올리던 repository.
- 새로 필요한, 1. 의 _site folder를 저장할 repository.
저는 기존의 repository인 shlrur.github.io 의 파일들을 first-blog.maker라는, 새로 만든 repository에 옮겼습니다.
그리고 first-blog.maker에서 생성되는 _site folder의 내용을 shlrur.github.io에 올려서 https://shlrur.github.io/ 주소로 blog에 접속할 수 있도록 하였습니다.
이 방법을 사용하면 jekyll-paginate-v2를 blog의 구조 생성에 사용할 수 있습니다. 하지만, 관리해야 할 repository가 하나 늘었고, commit/push 횟수도 늘어났습니다. 하나의 문제를 해결하기 위해서 귀찮은 작업이 추가되어 버렸습니다.
Using CI
CI(Continous Integration)를 사용해서 위의 과정을 자동으로 처리해 보겠습니다.
CI 툴로는 Jenkins, Travis 등이 있습니다.
Jenkins는 회사에서 frontend와 backend를 통합한 CI로 사용했는데, 설치형이기 때문에 따로 서버가 필요합니다. 저는 CI를 위해서 따로 서버를 사용할 생각은 없기 때문에 Jenkins는 사용하지 않기로 했습니다.
Travis는 Github와 연동하는데 편리하고, public repository에 대해서는 무료로 사용할 수 있다는 장점이 있습니다. 그리고 Travis Server를 이용하기 때문에 따로 서버가 필요하지도 않습니다.
그래서 저는 Travis를 사용하기로 했습니다.
Solutions for Using Troublesome Task
Travis CI를 사용해서 하려는 작업은,
first-blog.maker repository의 내용을 commit 및 push 했을 때, 해당 내용을 자동으로 build하고, build된 결과물인 _site folder의 내용물을 shlrur.github.io repository에 commit 및 push한다.
입니다. 그럼 찬찬히 과정을 따라가 보겠습니다. 아래의 과정을 따라가기 전에, first-blog.maker repository에 해당하는 repository를 본인의 pc에 clone 해 놓으셔야 합니다. 저의 repository를 예로 들어서 설명을 하겠습니다.
Git submodule 생성
first-blog.maker repository와 shlrur.github.io repository를 git submodule로 묶습니다.
first-blog.maker repository를 clone 한 경로에서 다음과 같이 command를 입력합니다.
git submodule add https://github.com/shlrur/shlrur.github.io exampleoutputname
그러면, first-blog.maker repository의 하위에 exampleoutputname이라는 이름의 folder가 만들어지고 이 폴더는 shlrur.github.io repository에 대한 local git repository가 됩니다.
exampleoutputname 이라는 이름은 맘에 드는걸로 사용하시면 됩니다. 단, _config.yml에 있는 destination property의 값과 같아야 합니다.
destination: ./exampleoutputname
정상적으로 clone이 진행되어서 submodule이 생성되면 command창에 다음과 같이 입력합니다.
git submodule update
Travis에 Github repository 연결
Travis 사이트에 접속해서 GitHub Repository에 대한 연결을 활성화합니다.
기본적으로 Public Repository만 사용할 수 있으며, Private Repository를 사용하고 싶으면 다른 주소를 가지는 Travis 사이트에서 별도의 비용을 지불해야 합니다.
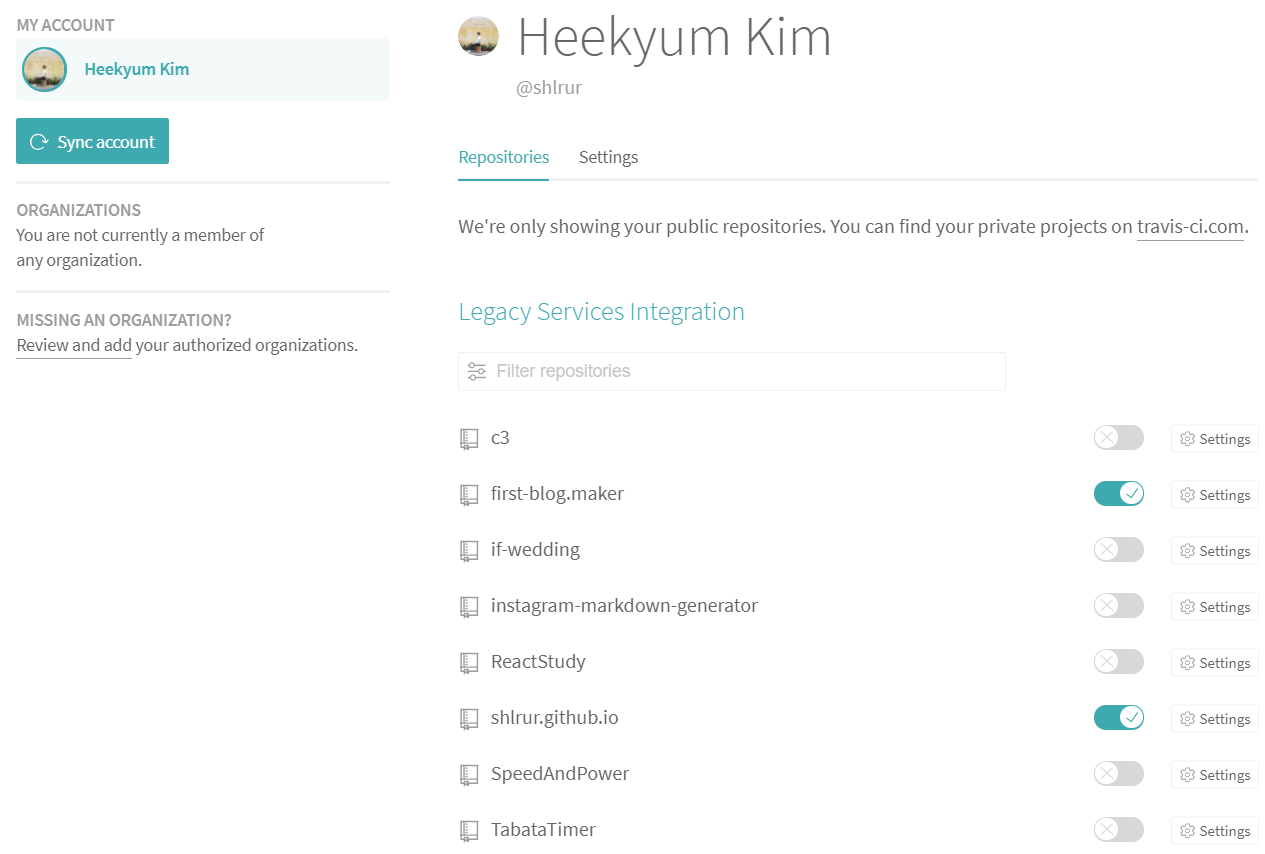
위의 그림과 같이, 필요한 repository 2개를 Enabled 상태로 바꿔줍니다.
잠깐 정리하자만, first-blog.maker repository에 push가 이루어지면 Travis CI가 .travis.yml 설정파일의 내용을 토대로 특정 작업을 수행하게 됩니다. .travis.yml 의 작성은 조금 아래에서 알아보겠습니다.
우리는 이 .travis.yml과 Rakefile을 이용하여 exampleoutputname안에 있는 내용을 commit하고 push하게 될 것입니다. exampleoutputname은 shlrur.github.io와 연동되는 repository이기 때문에 결국, Jekyll로 컴파일한 내용이 GitHub Page Repository로 들어가게 되는 겁니다.
Token 생성
Travis CI에서 다른 Repository(shlrur.github.io)로 push를 하기 위해서는 token이 필요합니다.
GitHub에 접속해 Setting > Developer settings > Personal access tokens에 들어가서 Generate New Token을 클릭합니다. 적당히 description을 작성하고 Select scopes 중 repo 선택하고 generate token을 클릭하면 새로운 token이 생성 됩니다. 이 token을 바로 이용할 건 아니기 때문에 어딘가에 잘 저장해 둡니다.
이 token값을 직접 Travis CI 설정파일( .travis.yml )에 직접 노출시키면 안되고 이 값을 암호화해서 사용해야 합니다. 일단 command 창을 열어서 travis gem을 설치합니다.
gem install travis
설치가 끝나면 다음의 명령을 이용해서 암호화를 진행합니다. 만약 로그인을 안했다는 메시지가 나오면 다음과 같이 로그인 후 진행하시면 됩니다. (ID/PW는 GitHub의 ID/PW를 이용합니다.)
travis login –pro travis encrypt GITHUB_TOKEN=
-r
여기서
travis encrypt GITHUB_TOKEN=123abc456xxx -r shlrur/first-blog.maker
위의 과정을 거치면 암호화된 값을 얻을 수 있는데 이 값을 아래와 같이 .travis.yml안에 설정하시면 됩니다.
env:
  global:
    secure: "Insert an encrypted value here."
branches:
  only:
    - master
Config 파일 설정
이제 _config.yml, .travis.yml, Rakefile 파일을 아래와 같이 적절하게 수정해야 합니다. Ruby언어로 작성된 script를 보는게 영 껄끄럽지만 어렵지 않는 내용이니 천천히 보시면 됩니다.
# _config.yml
# for Travis CI. (shit custom gem api...) ##################
destination: ./exampleoutputname

production_url: https://shlrur.github.io/
source_url: https://github.com/shlrur/first-blog.maker

safe: False
lsi: False

username: shlrur
repo: first-blog.maker
branch: master
############################################################
# .travis.yml
sudo: false
language: ruby
cache: bundler
rvm:
- 2.4.2

install:
  # Install Jekyll and dependencies
  - bundle install

before_script:
  - git config --global user.email "shlrur123@gmail.com"
  - git config --global user.name "shlrur"

script: bundle exec rake site:deploy --quiet #--trace

# Generate your secure token with the travis gem:
# get Github token from your Travis CI profile page
# gem install travis
# GH_TOKEN from https://github.com/settings/tokens
# travis encrypt 'GIT_NAME="YOUR_USERNAME" GIT_EMAIL="YOUR_EMAIL" GH_TOKEN=YOUR_TOKEN'
env:
  global:
    secure: "ssssssssssssss"
branches:
  only:
    - master
# Rakefile
#############################################################################
#
# Modified version of jekyllrb Rakefile
# https://github.com/jekyll/jekyll/blob/master/Rakefile
#
#############################################################################

require 'rake'
require 'date'
require 'yaml'

CONFIG = YAML.load(File.read('_config.yml'))
USERNAME = CONFIG["username"]
REPO = CONFIG["repo"]
SOURCE_BRANCH = CONFIG["branch"]
DESTINATION_BRANCH = "master"

def check_destination
  unless Dir.exist? CONFIG["destination"]
    sh "git clone https://$GIT_NAME:$GITHUB_TOKEN@github.com/#{USERNAME}/#{REPO}.git #{CONFIG["destination"]}"
  end
end

namespace :site do
  desc "Generate the site"
  task :build do
    check_destination
    sh "bundle exec jekyll build"
  end

  desc "Generate the site and serve locally"
  task :serve do
    check_destination
    sh "bundle exec jekyll serve"
  end

  desc "Generate the site, serve locally and watch for changes"
  task :watch do
    sh "bundle exec jekyll serve --watch"
  end

  desc "Generate the site and push changes to remote origin"
  task :deploy do
    # Detect pull request
    if ENV['TRAVIS_PULL_REQUEST'].to_s.to_i > 0
      puts 'Pull request detected. Not proceeding with deploy.'
      exit
    end

    # Configure git if this is run in Travis CI
    if ENV["TRAVIS"]
      sh "git config --global user.name $GIT_NAME"
      sh "git config --global user.email $GIT_EMAIL"
      sh "git config --global push.default simple"
    end

    # Make sure destination folder exists as git repo
    check_destination

    sh "git checkout #{SOURCE_BRANCH}"
    Dir.chdir(CONFIG["destination"]) { sh "git checkout #{DESTINATION_BRANCH}" }

    # Generate the site
    sh "bundle exec jekyll build"

    # Commit and push to github
    sha = `git log`.match(/[a-z0-9]{40}/)[0]
    Dir.chdir(CONFIG["destination"]) do
      # check if there is anything to add and commit, and pushes it
      sh "if [ -n '$(git status)' ]; then
            git add --all .;
            git commit -m 'Updating to #{USERNAME}/#{REPO}@#{sha}.';
            git push https://$GITHUB_TOKEN@github.com/#{USERNAME}/#{USERNAME}.github.io.git #{DESTINATION_BRANCH} --quiet ;
         fi"
      puts "Pushed updated branch #{DESTINATION_BRANCH} to GitHub Pages"
    end
  end
end
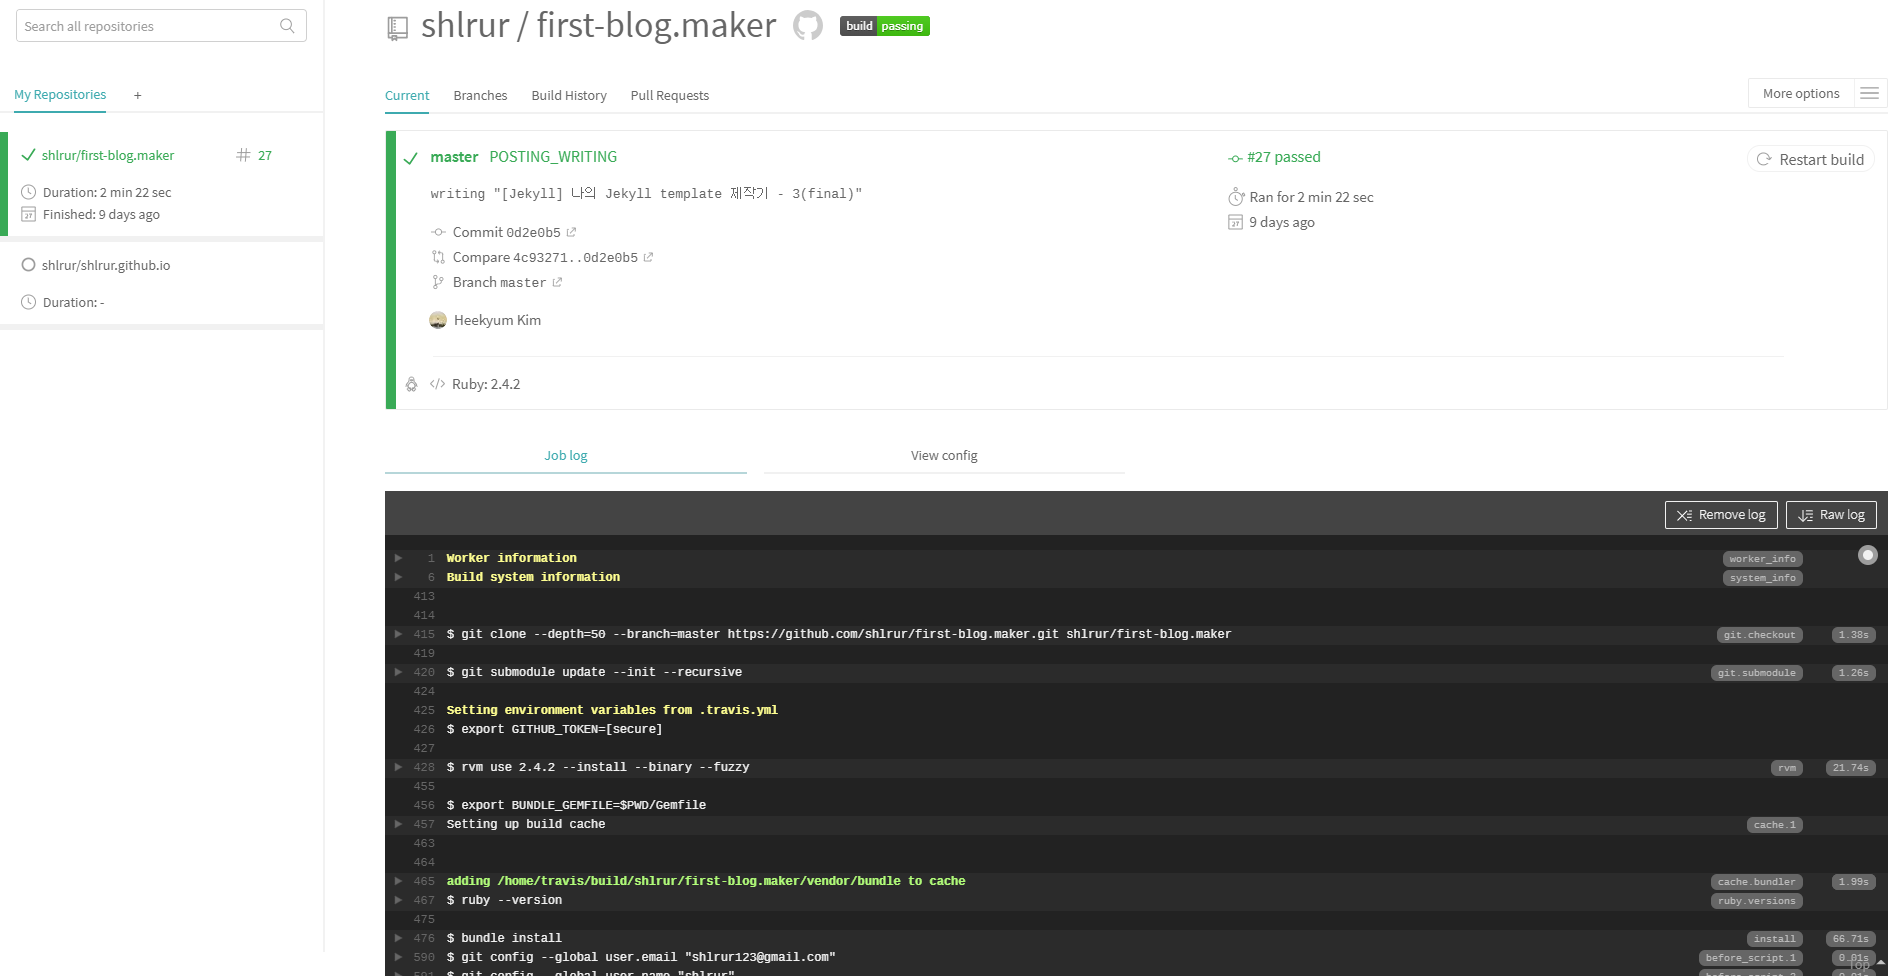
모든 설정이 끝났습니다. 이제 first-blog.maker repository에서 push작업을 해 보시면 Travis CI가 동작하면서 내부적으로 처리해서 결과를 알려줍니다. 해보시면 아시겠지만 거의 스팸메일처럼 날라옵니다.
Travis CI 사이트에 들어가면 CI Server가 어떻게 처리하는지를 실시간적으로 log를 출력해 보여주는데 그걸 보시면서 혹 문제가 있는 부분이 있으면 해결하시면 됩니다.
Conclusion
3편에 걸쳐서, 저만의 블로그를 만들면서 겪었던 시행착오에 대해서 말씀드리고 해결했던 방법들을 보여드렸습니다.
블로그를 만들면서 어떠한 이유로 막혔던 순간과 어떻게 해결했는지에 대한 내용을 정리해 보고 싶었습니다.
Jekyll Blog는 비교적 어려운 방법이기 때문에 사용하는 사람이 많지 않습니다. 하지만 매우 매력적인 방법입니다. Jekyll을 사용해서 blog를 만드는 분들 중에 저와 같은 문제에 부딪힌 분들에게 이 포스트들이 도움이 되었으면 합니다.